Paper Foxes

IMG_0806

Alternate post title: “Fold-a-fox!” But I decided that was too lame, even for me.
Anyway, these paper creatures are simple, adorable, and best of all appropriate if your college mascot happens to be, say, the Marist red foxes. Ok, so I’m pulling from experience with this one, and in honor of Marist’s Fox Fest yesterday, I folded up one of these foxes.

What you need:
– red, white, and black paper (I used card stock, but that weight of paper isn’t necessary.)
– scissors (and paper cutter, if you have one)
– clear tape
– glue stick
IMG_0799

What to do:
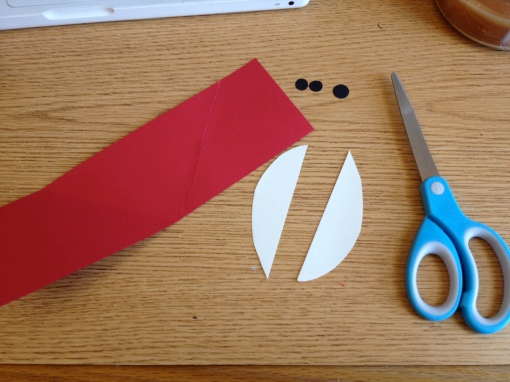
1) Cut a red strip of paper, about 2″ wide, 2 white semi-ovals, and three small black dots (2 of them identical) as pictured above.
2) Fold both ends of the red strip of paper in and up so that the two sides of the bottom half meet in the middle. (See image below)
3) Trim the top of the shape to about 1/2″.
4) Turn the shape over and seal the open seam with a piece of clear tape.
5) Glue white shapes and black circles onto red paper as shown below.
6) Starting from each upper corner, trim the fox’s ears by cutting diagonally into the center where the ear meets the head.
7) Make a celebratory fox scream, you’re done!

Magazine Page Origami Bows

IMG_0793

Thought the only way to recycle magazine pages is to shred them into a fun shape? Nope! With a few snips and a little attention to detail, your old magazines can make you tons of these nifty origami bows, which I found through my trusty friend How About Orange. They’re pretty versatile; you could go the traditional route and slap them on top of a gift (they’re flat, so they’re great if you need to stack or mail gifts!), or just stick a few on your wall to jazz things up.

Get your fingertips ready for some creasing, because this project is super cute, but it requires a gentle, yet precise hand.

What you need:
– 1 magazine page
– scissors
– ruler

IMG_0789

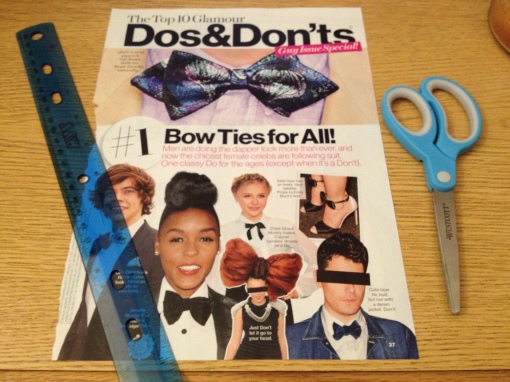
Any magazine page will work, but the more colorful the page, the more colorful your resulting bow will be. I decided to be punny and make a bow out of a page about bows.

What to do:
1. Using a ruler to measure, trim your magazine page to a 6″x6″ square. (You could use any size square, really, but 6″x6″ is a good practice size.)
2. Follow these steps (via Let’s Create)
3. Voila! Repeat as necessary.

FYI:
For those of you who aren’t up on your origami lingo, “mountain fold” means to fold the paper so that the crease is popping out toward you; “valley fold” means to fold the paper so that the crease is indented downward toward the table.

Happy folding!

Mention Monday: Blitsy

blitsyIt’s like Groupon for crafts!

Ok, so that’s not actually Blitsy‘s slogan, but it should be (if we’re going to ignore copyright infringement), because this up-and-coming members-only shopping website gives you all the goodness of Groupon discounts but is focused entirely on crafting supplies. New products are posted every Monday, Wednesday, and Friday at 11 a.m. (EST) on sale for prices up to 60% off their retail value. The products remain on sale on the site for 7 days or until they sell out.

For the time being, nearly all of the products for sale pertain to scrapbooking and other paper crafts, but the site promises that it will soon expand to include a wider array of general crafting supplies. Much like Groupon, this isn’t the sort of site you search through to find a specific product, but browse the available items to stumble upon an unexpected great deal, like 24 spools of self-adhesive glitter tape for $12.95 (just about half price):

glitter tape
As I mentioned briefly before, the site is members-only, and you have to log in to see most of the product details, but this is really no biggie since membership is FREE! Simply create a user ID and password, or log in through your existing Facebook account and you’re home free. Your membership comes with e-mail notification of every new sale, but you can unsubscribe from these if you’d rather just use the site from time to time.

There’s also a referral incentive. Invite your friends to join Blitsy and you’ll get $10 in site credit when a friend makes their first purchase. And according to their Twitter, there are free giveaways every Tuesday! This site is definitely worth checking out. Registering is free and easy and there’s no strings attaches, and you never know when you’ll see a product for sale that will inspire you!

Happy bargain crafting!

Mention Monday: Dude Craft

dudecraft

Attention: men! Are you interested in making cute, frilly DIY crafts to decorate your apartment? Didn’t think so. That’s why Dude Craft is perfect for you. It’s exactly what it sounds like: crafts for men. Well, it’s not explicitly crafts, nor is it limited to projects by men or for men. “Guys who knit, girls who weld, it’s all the same on DudeCraft,” wrote the site’s moderator, Paul Overton. But it is a crafty blog dedicated to stimulate the minds and creative juices of the right brain-savvy male population.

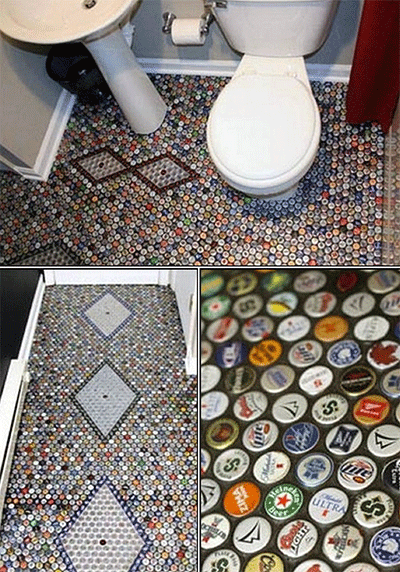
This blog highlights some of the coolest crafts and DIY project inspiration to appeal to the male audience, like this beer cap bathroom floor that would make for a sick bachelor pad bathroom:

beercaps

All of the projects link out to the sites they originate from; some have tutorials, and others just recognize the work of artists, like these match box prints by Tom Frost.

The coolest thing I found on the site is today’s post- Beethoven Sonatas expressed visually:

beethovensonata
I can’t honestly say that I “get it,” but it’s one of those mind = blown situations.

Long story short, if you’re a guy looking to get in touch with your crafty side, or if you’re a woman looking for craft inspiration to make a project for a guy, Dude Craft is definitely the way to go.

Happy crafting, bro.

Cut & Paste: Magazine Scrap Decor

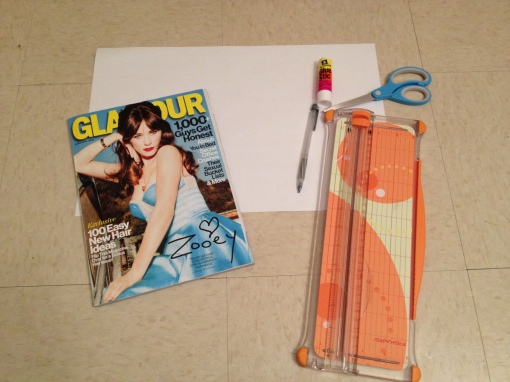
IMG_0780This craft is a cute way to upcycle old magazines and make some one-of-a-kind wall decor. Best of all, it requires minimal supplies though the cut and paste technique required can get to be a bit tedious. My inspiration for this project came from this pin, but there were no instructions attached, so I decided to eyeball a recreation. It was definitely a success, but I need to add a very important disclaimer: do not attempt this project without a paper cutter! I mean, you could, but your poor crippled fingers would probably never be able to grasp an object ever again by the time you’re done. Alright, maybe that’s an exaggeration, but whatever.

What you need:
– Any type of paper
– Paper cutter
– Scissors
– An old magazine
– Pencil
– Glue stick

IMG_0762What to do:
1. Draw the outline of your desired shape onto your paper. If you don’t trust yourself to draw a cohesive shape, you could easily find a template online and print it out.
2. Cut out your shape(s).
3. Using a paper cutter, cut one magazine page at a time into 1/2″ strips. The more colorful the pages you choose, the better.
4. Spread glue onto your cut-out shape, and start gluing down your magazine strips side-by-side, the bottom of the strips starting at the horizontal halfway point of your cutout.
5. Once the top of your shape is covered in magazine strips, flip it over and trim the excess magazine strips with scissors.
6. Flip your shape back over and repeat steps 4 and 5 on the bottom half of your cutout.

I decided to make this craft a 2-parter, so I cut out a small heart to accompany my main cutout. Since this cutout was so small, I only used one row of magazine scraps rather than two rows horizontally stacked.

This project turned out super cute and made a great addition to my dorm wall. If there’s anything the experience taught me, though, it’s that if you choose to do this project sitting on the floor, take a break every 20 minutes or so to spare your back some soreness. The project was certainly worth it though; you have total creative control. Other ideas to try would be spelling out names or shredding pages to keep with a certain color scheme. One magazine could probably make at least 10 cutouts, so experiment away!

IMG_0781Happy scrapping!

Mention Monday: Waffle Flower Papercrafts

waffle flower

So, I’ve found my new card-making idol. I’m looking at you, Nina Yang. I’ve always considered myself an amateur paper crafter when it comes to cardmaking–basically meaning that my supply list when it comes to making cards doesn’t extend much further than cardstock, glue, and silver Sharpie. I know I could step it up a level if I had a Cricut machine, but I’ve always been more of a hand-cutter, and the biggest improvement I’ve made in that department was last year when I bought a swivel-head X-acto knife and self-healing cutting mat (a strongly-recommended life decision).

Waffle Flower paper crafts is (in my non-professional opinion) the pinnacle of handmade cards and other paper crafts. Scrolling through, there’s not a single project that I’m not impressed with. The wanderluster in me is particularly impressed by this Wish You Were Here card:
nina-yang-wish-you-were-here

via Waffleflower.com

There’s more than just perfect cards on the site, though. There’s links to free pattern downloads, free templates (like these cool paper bow ties), and instructional tutorials (like these twist open photo boxes).

Even if you don’t have all the tools or technical skills to recreate any of these cards or paper crafts, this is a great place to go for inspiration, especially if you’re someone like me who has trouble with coming up with card sentiments.

Happy paper crafting!

Tried It. Loved It. Print Your Own Post-it Notes

Flash back to Mid-March and you may remember that I mentioned the DIY blog How About Orange and their original template for printing your own Post-its. Well, this little project was too cool to ignore, so I tried it and now I’m here to rave about the results. IMG_0734

If you have a few Post-its and a printer loaded with paper, you’ve got everything you need for this simple but unique project.

What you need:
– 6 Post-it notes (any color)
– Printer with black ink
– Printer paper
– Pen/pencil/marker/anything that writes

What to do:
1. Visit How About Orange and download the free template from this page. Print out one copy.
2. Stick one Post-it on each of the 6 squares on the template page. Make sure to press down hard on the adhesive so they’re stuck tight, and make sure they’re lying as flat on the page as possible.
3. Load the Post-it covered template page back into your printer so that the page will print with ink on the Post-its. *Each printer is different, so make sure you know which way to load your paper to print on the right side. For most printers, your Post-it side of the page will be facing down.
4. Print another copy of the template. If you loaded your paper correctly, the template should print onto your Post-its.
5. Write your custom message on your printed Post-its and share the love!

When I tried this craft, I avoided a paper jam, but occasionally the bottom corners of my Post-its would bend up and get a little stuck in the printer. Nothing serious, though; just make sure you keep an eye on the page as it’s printing to avoid a jam.

Happy posting!

Mention Monday: La Photocabine

photocabine

Ever been to a wedding or a birthday party where they bring in an instant-print photo booth? Even with all of the cell phone/camera technology there is today, nothing says classic like that fresh little Polaroid strip you hold in your grasp following 30 seconds of awkward posing. Photo booth strips make much cooler wall decor than your standard point and click results, which is why La Photocabine is just plain cool. La Photocabine is an online photo booth. Just click the curtain on the homepage to enter the booth, which is desgiend to look like a real vintage photo booth (very cute); then when you’re ready with 4 poses in mind, press the red button and you’ll have an instant-photo esque strip at your digital disposal.

photocabine2

As soon as the booth is finished snapping your photos, you’re presented with a digital photo strip, which you can arrange either in traditional vertical fashion, or a sort of 2-by-2 arrangement; you also have the choice of color or black and white photos. You can then save, print, send, upload, or copy the URL to your photo strip. If you have a high-quality printer and some glossy photo paper, you’ve got a perfect at-home photo booth strip. This would be adorable for holiday cards, scrapbooking, or any other number of random projects.

The site will automatically display in French, but there are little flags at the top left corner of the page that let you translate the commands into your native language. It only took me 25 minutes playing around with the page to figure that out, too…

As far as the origin of the site goes, from what I can tell, this is a sister site of Ledjam. There’s no English translation for that site, so my best educated guess is that Ledjam is a company that provides real-life photo booths for events, and La Photocabine is just a way for them to get their name out and advertise their product.

photocabine reelThis site is definitely a fun time-waster and it’s the perfect photo booth DIY.

Happy snapping!